Most landlords focus on move-in and move-out inspections but skip the critical middle: a proactive mid-lease walkthrough. A scheduled check 6–12 months into the lease catches small problems before they become expensive disasters—leaks become water damage, loose fixtures become safety hazards, and deferred repairs compound.
For remote landlords especially, mid-lease inspections are your eyes and ears on the property. They reduce turnover costs, extend rental life, and help you support good tenant relationships by addressing maintenance needs promptly.
Schedule Strategically and Give Notice
Professional landlords schedule mid-lease checks just like lease renewals:
- Timing: Plan the inspection for 6–9 months into the lease, giving you time to address issues before move-out.
- Notice to tenants: Provide 24–48 hours written notice stating the purpose: “Routine property inspection and maintenance assessment.” This respects tenant privacy and establishes professional practices.
- Reasonable hours: Conduct inspections during standard business hours (9 AM – 5 PM) when possible, and keep them brief (30–45 minutes).
- Treat as collaborative: Invite the tenant to walk along, take notes together, and discuss any maintenance issues they’ve noticed. This fosters positive relationships and surfaces problems you might miss.
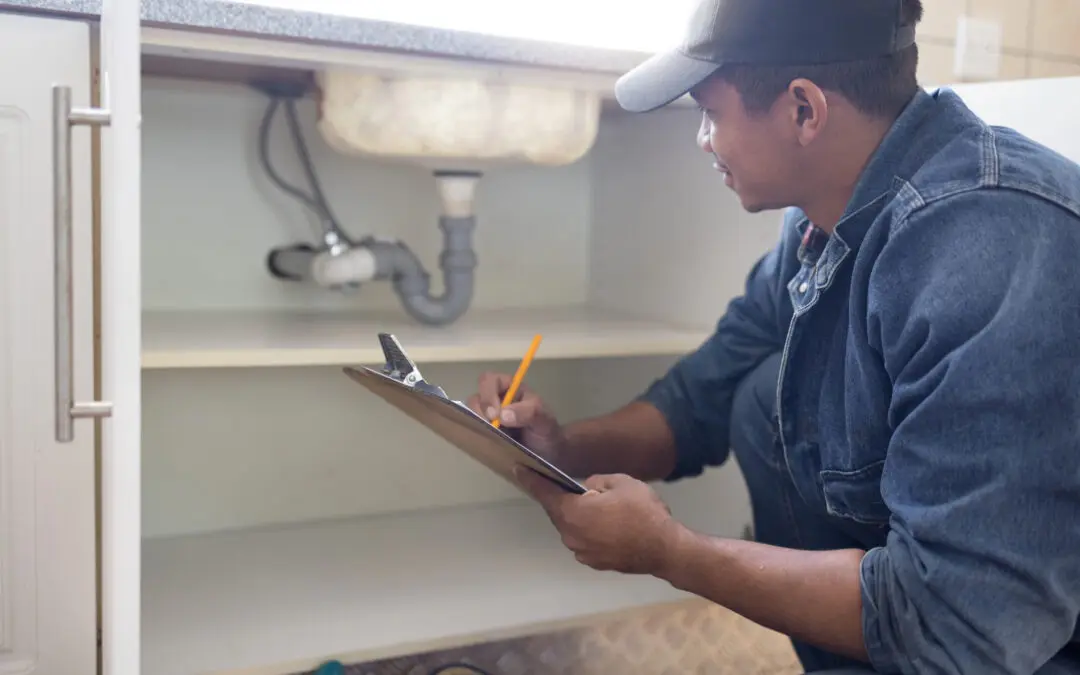
Check Under Sinks and Around Plumbing
Leaks under sinks cause mold and structural damage silently:
- Inspect under kitchen and bathroom sinks: Look for water stains, soft wood, corrosion on pipes, or mold around connections. Check if tenants have placed water-catching containers (a sign of leaking they’ve been managing).
- Verify caulk integrity: Gaps in caulk around sinks allow water behind walls. If caulk is missing or deteriorating, note it for re-caulk before move-out.
- Check for drips: Open cabinets, turn on water, and look for active drips. Even slow drips add up to significant water damage over time.
- Inspect supply lines: Corroded or bulging water supply lines are failures waiting to happen. Replacement is inexpensive and prevents expensive water damage.
Review Caulk and Grout Around Wet Areas
Bathrooms and kitchens are moisture-prone. Deteriorating caulk and grout allow water behind walls where it causes mold and decay:
- Bathroom shower and tub: Inspect caulk lines for gaps, mold, or deterioration. Grout between tiles should be intact and not crumbling.
- Around bathroom fixtures: Caulk around the toilet base and vanity edges keeps water out of subfloors.
- Kitchen backsplash or tile: Integrity matters. Note any areas needing re-caulk or grout repair.
- Plan re-caulk before move-out: Re-caulking is a quick, inexpensive refresh that prevents major water damage.
Inspect Walls and Doors for Damage
Normal wear vs. tenant damage is important to distinguish (and document):
- Wall damage: Note holes, gouges, or deep scratches beyond normal wear. Large holes indicate careless furniture moving or damage.
- Door damage: Check for bent or dented doors, broken locks, or frames that are cracked.
- Trim and baseboards: Look for damage, scuffs, or areas that need repainting before the next tenant.
- Document with photos: Take dated photos of any damage. This protects both you and the tenant by creating a clear record.
Test Exhaust Fans and Ventilation
Bathroom exhaust fans prevent moisture buildup and mold:
- Turn on each exhaust fan: They should operate quietly and pull air effectively. If they’re noisy, weak, or disconnected, they need attention.
- Check duct connections: Exhaust ducts should be properly connected and vented outside (not into attics or walls). Disconnected or poorly vented ducts cause moisture damage.
- Clean return grilles: Lint and dust accumulation reduces fan efficiency. A quick cleaning usually requires just vacuuming the grille.
Verify Smoke and Carbon Monoxide Detectors
Life safety devices are your responsibility to maintain and test:
- Test all detectors: Press the test button on each detector. They should alarm within 3 seconds, indicating working battery and function.
- Note detector age and condition: Most detectors are good for 7–10 years. If you find outdated or non-functional units, replacement is required before the next tenant.
- Document in your records: Keep a log of detector testing and maintenance. This protects you legally and ensures compliance.
Address Maintenance Issues Discovered
If you discover tenant-created damage or maintenance needs during your inspection:
- For minor tenant damage: Document it and address at move-out per your lease damage policy.
- For maintenance issues: Send the tenant a friendly note: “During our routine inspection, we noticed . We’ll schedule a repair on . Please be available for access.” This shows you’re maintaining the property and tenants appreciate timely attention.
- For safety issues: Address immediately. Broken smoke detectors, exposed electrical hazards, or structural damage can’t wait.
Create a Mid-Lease Inspection Checklist
Consistency matters. Use the same checklist for each property and tenant. Your inspection should cover:
- Plumbing (supply lines, leaks, caulk)
- Electrical (outlets, switches, lighting)
- Walls, doors, trim (damage and wear)
- Appliances (function, cleanliness, condition)
- HVAC (filter condition, system operation)
- Safety devices (smoke/CO detectors)
- Exterior (if applicable)
Keep copies in your tenant records and in cloud storage for easy access across your portfolio.
Build Landlord-Tenant Partnerships
Mid-lease inspections show tenants you care about the property—and them. When you promptly address maintenance issues, tenants are more likely to report problems early instead of living with them. This prevents small issues from becoming emergencies.
If your property portfolio has gotten too large to manage inspections yourself, or if you rent remotely, we provide comprehensive mid-lease property inspections and maintenance assessments. We’ll document condition, photograph issues, and provide a report so you stay informed. Request a quote or call 617-780-5293 to schedule an inspection.